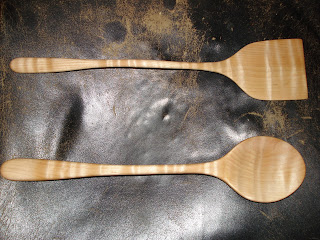
Handmade wooden kitchenware!! That's right we know how to start the New Year the right way! Last weekend I went to the Baltimore Woodworking Show (actually in Timonium, MD). I picked up a sanding belt and disc for my stationary sander that I had not had a chance to use since purchasing a year ago. I instantly had a project I could complete, a wooden spoon.
And it begins with scrap wood, I had some extra curly maple scraps that had been collecting dust for years. The piece was approximately 1" thick, 3" wide by 14" long. I was sure this would work great (because I measured some manufactured kitchenware) Hint: Use standard dimensions on common household items. How long has the wooden spoon been around? Whoa that's deep!
So after feeling the handles and getting my dirty hands all over our serving and stirring utensils. I realized what felt comfortable to me. So the layout begins, I sketched with pencil, looked at it, held a metal spoon over it, I was close. Then I traced the metal spoon. Wow I had a template right in front of me. I am not concerned with making a copy, because there is still a lot of room for refinement.
So time for the band saw I rough cut the shape. Fortunately it did not need to be perfect, every surface was still going to have a lot more material removed.
I get to use the the new (to me) sander! EYE PROTECTION is mandatory on this beast. I begin to roughly shape it into a spoon. I started with the dish part of the spoon then the backside leaving the handle for last. Then always a little more tweaking and straitening all over.
With the spoon basically roughed out to a shape and feel I was happy with, it was time for fine tuning. That power sander while very fast, leaves a pretty rough surface. I really don't like hand sanding too much so I went with the bastard file. I was able to work on the convex backside of the spoon and handle pretty well with the file, and it removed the heavy scratches as well as refining the curves. Then came time for hand sanding and a lot of it. I finished with a 220 grit sandpaper and it looked fine.
I wasn't sure what kind of finish to use. So I did a little research and found that coconut oil is a very good food safe finish and heat resistant. Also my hippie girlfriend happened to have coconut oil in the refrigerator. After three coats of oil it is done! In my research I found that it is best to let the oil cure for 2 months before using. So now we wait, and until then they look quite nice in our kitchen!
I made a spatula also. It was nice to be working wood again, and with the shop itself being a work in progress, this was a good project. See you next time.
Saturday, January 15, 2011
Tuesday, December 28, 2010
Baltimore Woodworking Since 2010
I am trying to get this first post up before the New Year. The shop is still in disarray. None of the machines have power going to them yet. I am going to run the jointer and planer with extension cords tonight. But I have completed my first project! I made a glass vase stand for a friend(no money yet :( ). I used mostly hand tools except for the router and bandsaw. So here it is a walnut vase stand with maple hold downs!
I really can't wait to get the shop set up better so that I can mill lumber properly. I am not sure what my next project will be. But I hope to build something using traditional joinery, doors and drawers would be nice too. But I am still setting up shop so I am moving forward at a gradual pace. See you next time.
Subscribe to:
Comments (Atom)


